
Desserts are the most forgotten meals on a camping trip, right? Dinner gets all the attention, while sweets are reduced to a few candy bars, packaged cookies, or the same old s’mores everybody has already made dozens of times before.
However, this need not be the case anymore as we have listed for you some camping dessert recipes that are quick and easy to make for a truly memorable camping adventure.
With the few resources to work with, these dessert recipes are fashioned to use simple cooking methods without compromising the taste. Besides, we’ll only discuss healthy recipes that are a great fit for the health-conscious campers.
Below we’ll discuss ingredients, cooking methods, and tools required for a delicious camping dessert that will be loved by both kids and adults! So, if you’re looking for new ideas, take a look and choose the one that fits your needs the best.
Tools Needed To Make Camping Desserts
If you are new to camping, you need a guideline on the tools that you’ll need to make your dessert(s). The recipes we put together here for you can be cook over a campfire using a foil pack, Dutch oven or cast iron skillet, but you’ll also need some additional tools so the job can go smooth.
I like keeping things simple and bringing tools that can be reused for multiple meals instead of carrying separate gadgets for every recipe.
Cookware & Tableware
A lightweight cookware set with a frying pan, pot, serving spoon, and spatula will handle most camping desserts without problems. Aluminum cookware is lighter, while stainless steel usually lasts longer. Titanium is excellent if you care about weight, though it is more expensive.
A cast iron skillet is one of my favorite camping cooking tools because it works for everything from breakfast to desserts. But it is heavy, so I only bring it for car camping trips.
You will also want:
- Bowls or mugs
- Plates
- A cutting board
- Measuring cups and spoons
- A sharp knife (get one of my recommended bushcraft knives)
- Tongs
- Sporks or reusable utensils
If you are backpacking, skip anything bulky and focus on recipes with fewer tools and ingredients.
Spices & Ingredients Storage
Instead of carrying full-size containers, I usually pack small amounts of sugar, cinnamon, cocoa powder, or salt in reusable mini containers. Small waterproof containers or pill organizers work surprisingly well for camping spices.
And if your trip is more than a day or two, ingredient storage matters more than most people expect. Chocolate melts, fruit bruises easily, and dairy products can become risky if your cooler is not cold enough.
Other Useful Camping Tools
These are the items I find myself using repeatedly when making desserts outdoors:
- Grill rack
- Portable stove (here are even more camp stove recipes to try)
- Matchsticks or a solid lighter like one of the best survival lighters here
- Heavy-duty foil
- Can opener
- Food storage containers
- Cleaning sponge
- Biodegradable soap
- Quick-dry towel
- Cooler for car camping
- Odor-proof bags to avoid attracting unexpected and unwelcome wild guests
One more thing worth mentioning: if there is a fire ban where you are camping, many of these desserts can still be adapted for a propane stove or portable grill. I always recommend checking local fire restrictions before your trip.
With the tools covered, let’s move to the actual desserts!
7 Mouthwatering Camping Desserts for Your Next Camping Trip
My list below includes camping desserts that range from extremely easy to slightly more involved. Some are ideal for beginners, while others make more sense if you enjoy campfire cooking and have a bit more patience.
#1: Apple Crisp Dessert
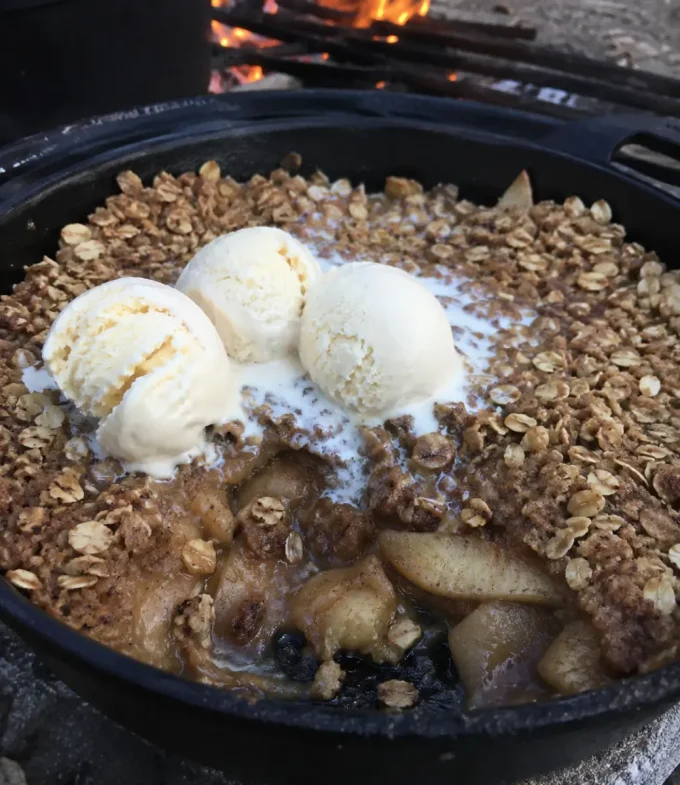
Apple crisp is one of my favorite camping desserts for cooler weather trips. It is simple, comforting, and smells incredible over a campfire. I also like that it feels homemade without requiring complicated baking.
This recipe takes around 15 minutes to prepare and about 35 minutes to cook.
Quick tip: Tossing sliced apples with a bit of lemon juice helps slow down browning while you prepare the rest of the ingredients.
Equipment needed
- A cutting board
- A sharp knife
- Wooden spatula
- Measuring cups
- Measuring spoons
- 10 inch cast iron skillet
Now, to make this recipe, you’ll need the following ingredients:
- 4 medium-sized peeled apples cut into ¼ inch slices
- ¾ brown sugar
- 2 tablespoons bourbon
- ½ teaspoon cloves
- 1 teaspoon cinnamon
- ½ tablespoon nutmeg
- 1 tablespoon oil or unsalted butter
- 1 cup granola
- Vanilla ice cream (for the topping)
Preparation
Preheat cast iron skillet over hot campfire coals and toss the apple slices (in a little butter) in the skillet and cook until soft. Add the brown sugar, cinnamon, nutmeg, cloves, and bourbon and continue to stir.
Continue to cook for 5-10 minutes until the sauce thickens and remove from heat. Sprinkle granola uniformly and serve. Add a generous scoop of vanilla ice-cream and enjoy the dessert.
Important tip: We recommend this recipe on the first camping night since ice-cream cannot hold together for long even in a cooler. With a bit of adjustment, this dessert can be a good fit for vegans but kids will love it as is.
#2: Plum Tart Dessert
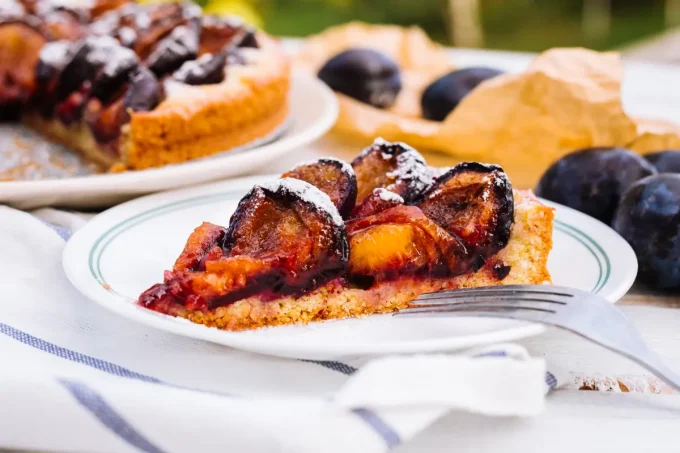
This dessert works best for car camping or glamping trips where you have extra prep space and a cooler. I would not recommend it for minimalist camping because it takes more effort than the other recipes on this list.
Still, if you enjoy campfire baking and want something different from the usual camping desserts, this tart is worth trying.
Equipment needed
- Chopping board
- Sharp knife
- Cast iron skillet
These are the ingredients that you’ll need to make this recipe:
- ½ cup cold water
- 1 cup fine flour
- 4 tablespoons butter
- 5-6 ripe plums
- ½ teaspoon salt
- 2 tablespoons sugar
- 2 tablespoons honey
Preparation
The pastry needs to be prepared at home, ahead of time, before camping. For this, mix flour and salt in a large bowl. Next, grate the butter and add to the mixture – rub the butter into the flour mixture until you acquire a breadcrumb-like texture.
Add a bit of water, stirring gently, to bind the dough, and let it chill for 15 minutes (wrapped). Next, take two sheets of baking paper and roll out the pastry about 3mm thick that can cover a skillet. (bottom and sides). Roll up the pastry sheets and refrigerate until camping time.
At the campsite, follow these steps:
Lay sliced up plums in a saucepan and add water and sugar. Place the pan with the contents on hot coals in the campfire, bring to a boil and simmer as you stir gently. Cook the plums for about 10 minutes until tender, remove from fire and separate the liquid in a different pan.
Take out your roll of pastry and carefully spread it out in a skillet, sprinkle some honey and over low fire, cover your pastry with aluminum foil and cook until the edges turn slightly brown. Remove from heat and serve.
#3: 10” Pineapple Upside-Down Cake
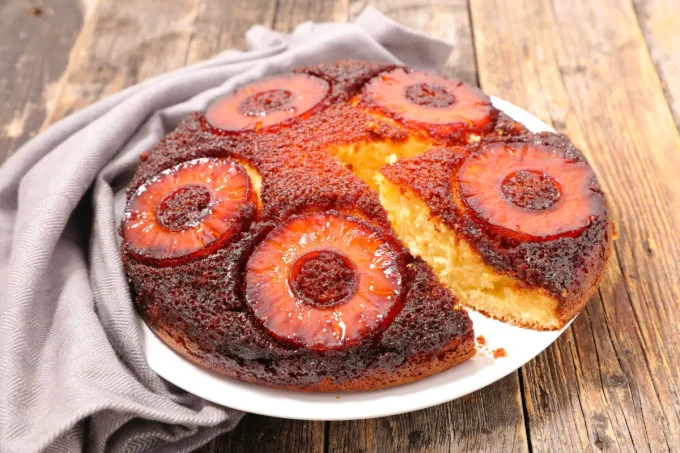
If you enjoy Dutch oven cooking while camping, this dessert is hard to ignore. The pineapple caramelizes beautifully over the heat, and the result feels much more impressive than the amount of work involved.
That said, this recipe makes the most sense for car camping because of the equipment required. It usually takes around 40 to 50 minutes to bake.
Equipment needed
- 10-inch Dutch oven
- Dutch oven carry bag
- Lid lifter
- Dutch oven lid stand
- Charcoal chimney starter
- Heat resistant gloves
- Heavy-duty tongs (useful for placing coals)
These are the ingredients that you’ll need to make a pineapple upside-down cake dessert:
- 1 cup all-purpose flour
- ½ cup butter
- 2 whole eggs
- 2 cups brown sugar
- 2 teaspoons baking powder
- ½ cup milk
- 1 teaspoon of vanilla or another extract of your choice
- Water
- Pineapple rings (1 can)
- Vegetable oil
Preparation
Follow this guideline to make the topping
Take an extra-sturdy aluminum foil and double line the Dutch oven. Place the oven on the campfire, melt butter in the oven, put in brown sugar and stir until you get a smooth thick mixture. Set the pineapple rings in the mixture (save the pineapple juice).
Next, soften butter in a separate pan and add sugar gradually until it lightens in color and expands in volume. After this, add the reserved pineapple juice, water (you can measure the volume using the pineapple can), eggs and beat the ingredients thoroughly. At this point you will add a pint of vanilla extract or a flavor of your choice.
This is how you will make the batter
In a large bowl, combine the flour, baking powder, butter and water and beat thoroughly to achieve a smooth batter. Pour the batter over the ingredients in the Dutch oven to cover the pineapples completely. Cover the Dutch oven with a lid and place 10-13 briquettes on top (briquettes are better than coal as they allow you to easily regulate the temperate in the oven)
Allow the cake to bake for 30 minutes until it turns golden brown. Lift the lid, insert a toothpick in to check if it comes out clean- this means that the cake is ready. Remove the oven from the fire and place a pan or another lid on top and flip the cake in one motion. Gently peel the foil away from the cake and voila! There you have your upside down pineapple cake.
#4: Banana Boat Dessert
This a perfect campfire banana rich-tasting dessert that only takes you 8-10 minutes to cook over a campfire. This dessert is for campers who don’t want to spend much of their time preparing a dessert – it also allows the kids to get involved in the cooking.
Equipment needed
- Heavy duty aluminum foil
- A knife
Here are the ingredients that you’ll need for this dessert
- Ripe bananas (as many as can accommodate the number of people you have)
- Chocolate chips/ Hershey chocolate/ peanut butter chips or other sweet-savory fillings
- Marshmallows
Preparation
First, cut the banana peel right in the middle (about 1/2inch) wide to look like a canoe – ensure the ends remain closed. Open the tab and scoop out half the banana.
Next, stuff the bananas with chocolate chips and marshmallows and wrap with aluminum foil. Place the banana over hot coals in the campfire and roast as you turn often for about 10 minutes. Now, remove the banana, peel gently and savor your dessert.
#5: Campfire Roasted Caramel Peaches Dessert
Just as its name suggests, this recipe is roasted over a campfire. It’s a great dessert recipe to make with kids and only takes about 25 minutes to cook.
There are plenty of seasonal fruits that can be tossed on a campfire that makes great desserts, and this is one of them. Roasted caramel peaches are so yummy and easy to make.
Equipment needed
- Aluminum foil
- Grill Rack
- Campfire
These are the ingredients that you’ll need to make this recipe
- Peaches (the amount will depend upon the number of people-however let’s assume we have two peaches for this particular recipe)
- ¼ cup pecan halves
- 1 teaspoon butter
- 2 tablespoons caramel sauce or 1 tablespoon brown sugar
Preparation
Heat up your grill and allow your campfire to slowly die down. Take a large sheet of aluminum foil and butter a six-inch section. Drizzle this part of the foil with a tablespoon of brown sugar or caramel. Scatter pecans uniformly over the caramel.
Next, slice your peaches into half and get rid of the pit. Now take the four peach halves and with the cut side upside down, place on top of the pecans (you can sprinkle the remaining caramel sauce)
After that, wrap your peaches tightly with aluminum foil and place on low grill or burned down coals. Let the peaches cook slowly for 25 minutes and remove from heat and immediately unwrap to allow the steam to escape for five minutes.
Once done, turn the dessert upside down on a plate and serve warm.
#6: Delicious Peanut Butter No Bake Cookies Dessert
Though these chewy little treats are common and remain a summer staple dessert for many families, they can sometimes become a sticky mess during cooking and turn out sandy and dry.
Nonetheless, following instructions keenly will be the difference between making soft creamy cookies or crumbly dry cookies.
Equipment needed
- Baking sheet or a saucepan
- A pot
- Medium cookie scoop
- A spatula
- Wax paper
- Airtight container
To yield 16 to 20 cookies, you’ll need these ingredients
- ¼ cup cocoa powder
- 3 cups quick- cooking oats (gluten-free if needed)
- ½ cup smooth peanut butter/crunchy peanut butter
- 2 cups sugar
- ½ cup milk
- ½ cup butter
- Pinch of salt
- 2 teaspoonful vanilla extract
Preparation
Prepare your baking sheet by covering it with wax paper and keep aside. Mix cocoa powder, sugar, butter, milk, and salt in a saucepan and place on the campfire. Stir the mixture constantly to allow the sugar to dissolve. Bring to a boil and then continue to boil for about two minutes.
Remove the mixture from the pan and add the rest of the ingredients (peanut butter, vanilla, and oats). Ensure that the mixture is coated with oatmeal.
Once everything is fully mixed, remove the pan from the heat. Using a medium cookie scoop, drop the dough onto the baking sheet. You can press the cookies and flatten them with a spoon or roll them gently between your palms into small balls.
Given the cookies 20 minutes to cool down and firm up. After eating, store any extra cookie in an airtight container.
Optional: you can make a topping to enhance the flavor of your peanut butter cookie. Take some caramel sauce and drizzle-you can substitute any other topping that you prefer.
#7: Campfire Orange Cake Dessert
This is the ideal camping version of cupcakes! The cake has a savory orange flavor and tastes like chocolate orange balls.
It takes about 50 minutes from preparation to finish. The cake batter recipe we shall discuss here will yield 10- 12 single serving orange cakes.
Equipment needed
- A sharp knife
- Grapefruit knife
- A spoon
- A fork
- A sifter
- A large bowl and a small bowl
- A whisk
- Heavy duty aluminum foil
- A pair of tongs
These are the ingredients that you will need to make this recipe
- 10-12 large navel oranges
- 1 cup of very hot water
- 1 ¾ all-purpose flour
- ½ cup vegetable oil
- 2 teaspoons of vanilla extracts
- 2 eggs
- 1 cup of milk
- 1 teaspoon salt
- 1 ½ teaspoon baking soda
- ¾ unsweetened cocoa powder
- 1 ½ baking powder
- 2 cups white sugar
Preparation
This is how you hollow out the oranges
Clean the oranges thoroughly and using a sharp knife, cut the top quarters (about 1 to 2 inches).
Using a grapefruit knife, cut the fleshy part of the orange away from the insides of the skin. Cut as close to the skin as possible then scoop out all the flesh in the orange with a spoon. The oranges and cups must be completely hollowed out. Repeat this process for as many oranges as you need.
Transfer the orange fruit in an airtight container to be eaten later or use it to make juice.
Follow this guideline to make the batter
In a large bowl, mix the flour, sugar, baking powder, baking soda, cocoa powder and salt. Whisk the dry ingredients to remove any lumps.
Crack the eggs into a separate small bowl and mix with vanilla, milk, and oil. Whisk the ingredients and transfer them to the larger bowl containing the dry ingredients.
Now you can add the water and beat the mixture thoroughly-the batter should appear thin.
Rake hot coals of your campfire into a flatbed and let the fire die down. Fill the oranges three – quarters full with batter, place the cap on each orange and wrap the oranges in a heavy – duty aluminum foil ( make sure the cap is positioned in an upright position).
Using a pair of tongs, place the oranges on the hot embers. Space the oranges several centimeters apart and let it cook for 15-20 minutes.
Once done, use the tongs to remove the oranges from the coals and let the oranges cool down for 10 minutes before opening them. Grab a fork and dig in to eat the orange cake dessert.
Also read (because nobody likes insects when camping, especially all over the food): My Homemade Insect Repellent Recipe for Full Protection.
Which Recipe Will You Make For Your Next Camping Trip?
If you thought campfire desserts were just limited to archaic s’mores, you have to try the dessert recipes we have discussed here. If planning to spend days in the woods, you have plenty of time to try it all and make your next camping trip more fun and exciting.
However, if you find some recipes difficult, the campfire orange desserts are an appealing option or better still, if you want to float your boat, you can do it with campfire melted bananas!

Daniel is a gear freak when it comes to hiking, climbing and camping. He went to REI Outdoor School to meet new people and learn best practices. Don’t even try to argue with him about the latest backpack or ice axe, he tried most of them. Daniel’s dream is to climb Mount Everest.